
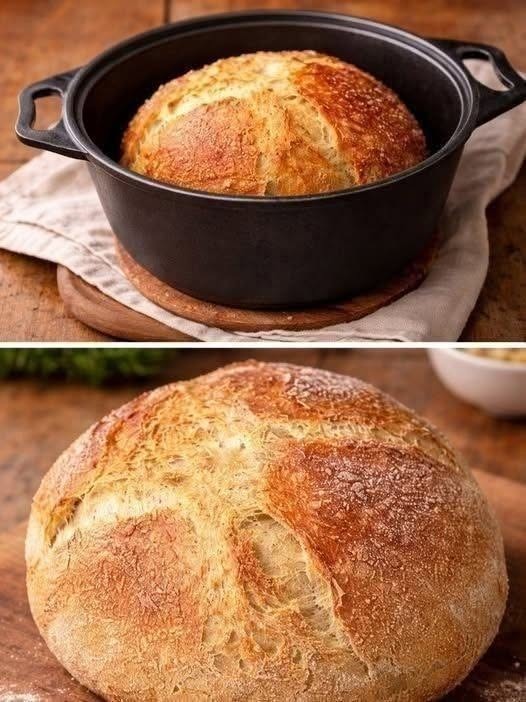
No-Knead Dutch Oven Bread—No Eggs, No Butter, No Kneading
Description
I don’t buy bread anymore! This easy no-knead Dutch oven bread is one of the simplest and most affordable homemade bread recipes you can make. You need only a handful of basic ingredients; there is no kneading, no eggs, and no butter, and the result is a beautiful rustic loaf with a crisp, golden crust and a soft, airy center.
The secret is letting the dough rest for several hours. Instead of spending time kneading, the yeast slowly develops the dough and builds flavor while you do almost nothing. Once the dough has rested, simply shape it, place it into a hot Dutch oven, and let the oven do the work.
The covered Dutch oven traps steam around the dough, which helps create that gorgeous bakery-style crust. When the lid comes off near the end of baking, the loaf develops its deep golden-brown color and irresistible crunch.
This bread is perfect for sandwiches, toast, soups, salads, breakfast, or simply spreading with olive oil and your favorite toppings. It is inexpensive enough to make regularly and so easy that even beginners can make a beautiful loaf.
Recipe Information
Prep Time: 10 minutes
Resting Time: 8–18 hours
Cook Time: 40–45 minutes
Total Time: About 9 hours
Servings: 10–12 slices
Yield: 1 large loaf
Cuisine: American / Rustic Artisan Bread
Difficulty: Easy
Ingredients
3 cups (360 g) all-purpose flour
1 1/2 teaspoons salt
1/2 teaspoon instant yeast
1 1/2 cups (360 ml) warm water
1 teaspoon honey or sugar, optional
1 tablespoon olive oil, optional
Extra flour for shaping
Instructions
Step 1: Mix the Dough
In a large mixing bowl, combine the flour, salt, and instant yeast.
If using honey or sugar, stir it into the warm water until dissolved.
Slowly pour the warm water into the flour mixture. Add the olive oil if using.
Using a wooden spoon, sturdy spatula, or your hands, mix everything together until no large patches of dry flour remain.
The dough will look shaggy, sticky, and somewhat messy. That is exactly what you want.
Do not knead the dough.
The goal of this recipe is to allow time to develop the gluten naturally instead of using physical kneading.
Step 2: Cover and Let the Dough Rest
Cover the bowl tightly with plastic wrap, a reusable cover, or a clean kitchen towel.
Leave the dough at room temperature for approximately 8–18 hours.
An overnight rest is especially convenient. You can mix the dough before going to bed and bake it the following morning.
During this resting period, the yeast slowly ferments the dough. You will notice that the dough becomes larger, bubbly, and much more elastic.
For the best flavor, avoid rushing this step.
Step 3: Check the Dough
After the resting period, remove the cover.
The dough should have increased significantly in size and should appear bubbly on the surface.
It will still be sticky. Don’t worry about that.
Generously flour your work surface and lightly flour your hands.
Carefully scrape the dough from the bowl onto the floured surface.
Step 4: Shape the Loaf
Instead of kneading, gently fold the dough over itself several times.
Pull one side of the dough toward the center, then rotate the dough and repeat with the other sides.
You only need a few gentle folds.
Shape the dough into a rough round loaf.
Avoid adding too much flour. A little flour is helpful for handling, but excessive flour can make the finished bread heavier and drier.
Place a sheet of parchment paper on your counter and lightly dust it with flour.
Transfer the shaped dough onto the parchment paper.
Cover loosely with a clean kitchen towel and let it rest for another 30–45 minutes.
Step 5: Preheat the Dutch Oven
About 30 minutes before baking, place your Dutch oven with its lid inside the oven.
Preheat the oven to 450°F (230°C).
Allow the Dutch oven to become extremely hot.
This is one of the most important steps for achieving the crisp, bakery-style crust shown in the picture.
Use a Dutch oven that is suitable for high-temperature baking. Be extremely careful when handling it because both the pot and lid will become very hot.
Step 6: Prepare the Dough for Baking
Once the Dutch oven is fully heated, carefully remove it from the oven.
Using oven mitts, remove the lid.
Lift the parchment paper containing the dough and carefully lower the dough into the hot Dutch oven.
You can leave the dough on the parchment paper. It makes transferring the loaf much easier and helps prevent sticking.
If desired, use a sharp knife or bread lame to make one or two shallow cuts across the top of the dough.
This gives the bread an attractive artisan appearance and allows the loaf to expand more evenly during baking.
Step 7: Bake Covered
Place the lid securely on the Dutch oven.
Return it to the oven and bake at 450°F (230°C) for approximately 30 minutes.
Do not open the oven repeatedly during this stage.
The covered environment traps steam released from the dough. This steam helps the bread rise and produces a thin, crisp crust.
Step 8: Remove the Lid
After 30 minutes, carefully remove the Dutch oven lid.
The bread should already be noticeably puffed.
Continue baking uncovered for another 10–15 minutes, or until the crust becomes a deep golden brown.
If you prefer a lighter crust, remove the bread earlier.
For a darker, crunchier crust, allow it to bake a few additional minutes, keeping a close eye on it.
Step 9: Cool Completely
Carefully remove the finished bread from the Dutch oven.
Place it on a wire rack.
Allow it to cool for at least 1 hour before slicing.
This step is important. The inside of freshly baked bread continues to set as it cools. Cutting too early can result in a gummy or slightly wet interior.
Once cooled, use a serrated bread knife to slice the loaf.
Enjoy with butter, olive oil, cheese, eggs, soup, sandwiches, or your favorite spread.
Notes
The dough should be sticky. Do not try to turn it into a firm dough by adding lots of flour.
The exact amount of water needed can vary slightly depending on the flour and humidity. If your dough looks extremely dry, add another tablespoon of water. If it is unusually wet, sprinkle in a small amount of flour while shaping.
Instant yeast works especially well for this recipe, but active dry yeast can also be used.
If using active dry yeast, you can dissolve it in the warm water for a few minutes before mixing.
The water should be warm but not hot. Very hot water can damage the yeast.
A long fermentation gives the bread more flavor. An overnight rest is ideal.
Tips for Perfect No-Knead Bread
1. Use a Kitchen Scale
Measuring flour by weight provides the most consistent results. Three cups of flour can vary considerably depending on how the flour is measured.
2. Don’t Overheat the Water
Use warm water around 100–110°F (38–43°C). It should feel comfortably warm rather than hot.
3. Give the Dough Enough Time
The long resting period is what makes this recipe work without kneading. If the dough has not risen much, give it more time.
4. Preheat the Dutch Oven
A properly heated Dutch oven creates an immediate burst of heat when the dough enters the pot.
5. Keep the Lid On at First
The covered portion of baking is responsible for trapping steam and helping create the beautiful crust and open texture.
6. Don’t Add Too Much Flour
Sticky dough is normal. Excessive flour during shaping can make the loaf dense.
7. Let It Cool
As tempting as it is to slice immediately, allow the bread to cool first for the best texture.
8. Use Parchment Paper
Parchment makes it much easier to transfer the sticky dough into the hot Dutch oven without burning yourself.
Serving Suggestions
This homemade bread is incredibly versatile.
Serve thick slices with:
Extra-virgin olive oil and herbs
Soup or stew
Tomato and cucumber salad
Scrambled or fried eggs
Avocado
Hummus
Feta cheese
Roasted vegetables
Grilled chicken
Turkey or chicken sandwiches
Peanut butter and banana
Jam or fruit preserves
For a simple Mediterranean-style snack, toast a slice and top it with chopped tomatoes, feta, oregano, olive oil, and freshly cracked black pepper.
It is also excellent alongside homemade soups because the crisp crust is perfect for dipping into flavorful broth.
Recipe Variations
Garlic Herb Bread
Add 1 teaspoon dried oregano, 1 teaspoon dried parsley, 1/2 teaspoon garlic powder, and a pinch of black pepper to the flour mixture.
Rosemary Bread
Add 1–2 tablespoons finely chopped fresh rosemary to the dough.
Cheddar Bread
Fold approximately 1 cup shredded cheddar cheese into the dough before shaping.
Whole Wheat Version
Replace up to 1 cup of the all-purpose flour with whole wheat flour. You may need an extra tablespoon or two of water.
Seeded Bread
Add sunflower seeds, pumpkin seeds, sesame seeds, or flaxseeds for extra texture.
Olive and Herb Bread
Add chopped Kalamata olives and dried oregano for a Mediterranean-inspired loaf.
Cinnamon Breakfast Bread
For a sweet variation, reduce the salt slightly and add cinnamon, a little extra honey, and raisins.
Make-Ahead Instructions
The dough is specifically designed to be prepared ahead.
Mix it the night before and allow it to ferment overnight. In the morning, shape it, let it rest briefly, and bake.
You can also mix the dough earlier in the day and bake it later.
If your kitchen is particularly warm, the dough may ferment faster. Keep an eye on it rather than relying only on the clock.
Storage
Store completely cooled bread at room temperature in a paper bag, bread box, or loosely covered container for up to 3 days.
Avoid storing crusty bread in the refrigerator because refrigeration can make bread stale more quickly.
For longer storage, slice the bread and freeze it in a freezer-safe bag for up to 3 months.
Individual slices can be removed from the freezer and toasted whenever needed.
Nutritional Information
Approximate nutrition per slice, assuming 12 slices:
Calories: 145
Protein: 4 g
Carbohydrates: 29 g
Fat: 1 g
Saturated Fat: 0.2 g
Fiber: 1 g
Sugar: 1 g
Sodium: 295 mg
Nutritional values are estimates and will vary depending on the flour, optional ingredients, and slice size.
Benefits
Simple Ingredients
This bread requires basic pantry staples rather than specialty ingredients. Flour, yeast, salt, and water are enough to make a delicious loaf.
No Eggs
There are no eggs in the basic recipe, making it useful for people who prefer egg-free bread.
No Butter
The basic recipe does not require butter. You can also leave out the optional olive oil for an even simpler loaf.
No Kneading
The long fermentation process allows the dough to develop structure without traditional kneading.
Budget Friendly
Making bread at home can be an economical way to enjoy fresh bread, especially when using basic ingredients already in your pantry.
Freshly Baked at Home
Homemade bread gives you control over the ingredients and allows you to enjoy a warm, freshly baked loaf whenever you want.
Frequently Asked Questions
Can I make this bread without a Dutch oven?
Yes. A Dutch oven provides the best environment because it traps steam, but you can bake the loaf on a heavy baking sheet or in another oven-safe covered baking vessel. The crust and rise may be somewhat different.
Can I use bread flour?
Yes. Bread flour works very well and can produce a slightly chewier loaf. You may need a small adjustment to the water depending on the flour.
Can I use whole wheat flour?
Yes, but using 100% whole wheat flour will produce a denser loaf. For a lighter result, replace only part of the all-purpose flour with whole wheat flour.
Why is my dough so sticky?
High-hydration no-knead dough is naturally sticky. Resist the temptation to add a large amount of flour. Use lightly floured hands and a scraper when necessary.
Why didn’t my bread rise?
The most common causes are inactive yeast, water that was too hot or cold, or insufficient fermentation time. Give the dough enough time to become bubbly and noticeably expanded.
Can I let the dough rise longer than 18 hours?
You can sometimes extend fermentation, especially in a cool kitchen, but very long fermentation can eventually weaken the dough. If your kitchen is warm, use a shorter rise time.
Can I use active dry yeast?
Yes. Active dry yeast can be substituted for instant yeast. Dissolving it in the warm water for a few minutes before mixing can help activate it.
Can I add seeds or nuts?
Absolutely. Sunflower seeds, pumpkin seeds, sesame seeds, walnuts, and other additions can add wonderful texture.
How do I get a darker crust?
Bake uncovered for a few additional minutes after removing the lid. Keep a close eye on the bread because the crust can darken quickly.
How do I know when the bread is fully baked?
The loaf should have a deep golden-brown crust and sound hollow when tapped on the bottom. If using a thermometer, the center should generally reach around 200–210°F (93–99°C).
Why should I let the bread cool before slicing?
Cooling allows the interior structure to finish setting. Cutting too early can cause the crumb to become gummy or compressed.
Can I freeze homemade bread?
Yes. Allow it to cool completely, slice it, and freeze it in an airtight freezer-safe bag. Toast slices directly from frozen when needed.
Final Thoughts
This no-knead Dutch oven bread is one of those recipes that makes homemade bread feel incredibly easy. There is no kneading, no eggs, no butter, and no complicated equipment beyond a Dutch oven. Just mix the ingredients, let time do the work, shape the dough, and bake.
The finished loaf has the rustic appearance of artisan bakery bread, with a deeply golden, crispy crust and a soft, chewy center. Once you see how simple it is to make, you may never look at store-bought bread the same way.
Whether you serve it with soup, turn it into sandwiches, toast it for breakfast, or simply tear off a warm piece and dip it into olive oil, this inexpensive homemade loaf is sure to become a recipe you return to again and again.