Just Lemon and Milk Homemade Feta Cheese in 5 Minutes
She kept her mouth open as she saw the entire procedure. It seemed like a trick because it was so easy. She quickly realized why her buddy hadn’t purchased it from a store in more than a year after tasting the outcome, which was creamy, tart, fresh, and somehow superior to what was in the plastic container.
Why This Works and Why It Is So Surprisingly Simple
Cheese — all cheese — is made through one fundamental process. Protein in milk is caused to coagulate — to cluster together and separate from the liquid whey — and the resulting solid mass is shaped, salted, and left to firm. What causes this coagulation varies. Traditional cheesemaking uses specific cultures and rennet. But there is a simpler, faster, and entirely natural way to achieve the same result — one that requires no specialist ingredients and no equipment beyond what is already in any kitchen.
Milk proteins — particularly casein — are sensitive to pH. In their natural state, held in stable suspension in neutral milk, they remain fluid and invisible. But introduce an acid — lower the pH suddenly and significantly — and those proteins change their electrical charge, lose their stability, and begin to cluster together into solid curds almost immediately.
The whiter, fresher, more delicate the acid used, the fresher and more delicate the resulting cheese. And the most natural, most flavour-compatible acid available in any kitchen — the one that produces a clean, bright curd with a flavour that complements rather than competes with the milk — is the juice of a lemon.
This is cheesemaking at its most elemental. Milk and acid. Heat and patience of just a few minutes. And a result that is fresher, more flavourful, and significantly less expensive than anything sold in a shop.
What You Will Need
1 litre of fresh whole milk ( full-fat gives the best result — do not use UHT or long-life milk as the heat treatment prevents proper curdling )
The juice of 2 large fresh lemons ( approximately 60 to 70ml )
1 teaspoon of fine salt ( or to taste )
A medium saucepan
A fine mesh strainer or colander
A piece of muslin cloth or a clean thin cotton tea towel for draining
A bowl to collect the whey
Optional: dried herbs such as thyme, oregano, or chilli flakes to mix through the finished cheese for extra flavour
Optional: a small amount of olive oil to store the cheese in after setting
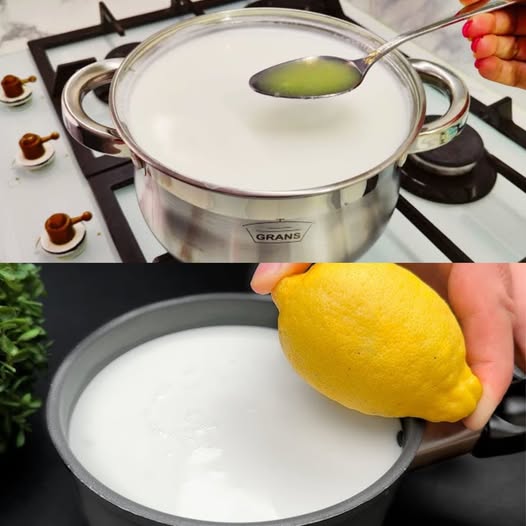
How to Make It
Pour the milk into a medium saucepan and place over medium heat. Warm slowly, stirring gently and occasionally, until the milk reaches a temperature just below boiling — small bubbles will appear around the edges and steam will rise visibly from the surface. Do not allow it to boil rapidly.
While the milk is heating, squeeze the lemons and set the juice ready in a small bowl.
When the milk reaches the right temperature, remove the saucepan from the heat. Pour the lemon juice in slowly and steadily, stirring gently as you go. Within seconds — sometimes within moments of the first addition — the milk will begin to curdle visibly. The white solid curds will separate from the yellowish liquid whey in a process that is genuinely satisfying to watch. Continue stirring very gently for one more minute to encourage full separation.
Leave the pot to rest undisturbed for five minutes. The curds will firm slightly and the separation will become more complete.
Line a fine mesh strainer or colander with the muslin cloth and place it over a large bowl to collect the whey. Gently ladle or pour the curdled milk into the lined strainer — do not rush or stir aggressively as this breaks the curds into smaller pieces than desired.
Allow to drain for 10 to 15 minutes for a softer, more spreadable consistency. For a firmer, more crumbly texture closer to traditional feta, gather the edges of the muslin cloth, twist gently to form a bundle, and hang it over the bowl or press it lightly with a small plate for 20 to 30 minutes longer.
When the cheese has reached the desired texture, transfer to a clean bowl. Add the salt and mix gently through the cheese, tasting and adjusting. Add herbs or chilli flakes if using and fold through. The cheese is ready to eat immediately.
To store, place in a clean glass jar or airtight container. Pour enough olive oil over to cover the cheese completely — this preserves freshness and adds a beautiful richness to the flavour. Refrigerate and use within five to seven days.
What to Do With the Whey
Do not discard the liquid left in the bowl beneath the strainer. This is whey — and it is nutritious, versatile, and completely free. Use it in place of water when making bread, soup, or porridge. Add it to smoothies. Use it to water plants — they love it. Or drink it warm with a little honey as a protein-rich, probiotic-friendly drink. Nothing from this process needs to be wasted.
What to Expect
The end product is a soft, fresh, tangy white cheese that melts into pastry, crumbles wonderfully over salads, goes well with roasted vegetables, and can be used in any recipe that asks for fresh cheese or feta. Because it is created from two ingredients without stabilizers, preservatives, or other additions, the flavor is fresher and cleaner than the store version.
About 200 to 250 grams of fresh cheese can be made with one liter of milk and two lemons at a quarter of the price of purchasing the same weight at the market.
There are two components. Active time is five minutes. And a basic item that never needs to be purchased from a store.